Hullo all! Please bear with me as I try to upload all the pics that I have taken using my trusty iphone. I have been diligently snapping away but uploading the pictures is a chore! =_= So it will seem as if I have disappeared but I am still here actually! hee hee! Till then! ;p
P.S. Does anyone know how to upload the pictures here directly using an iphone?
Thursday, December 16, 2010
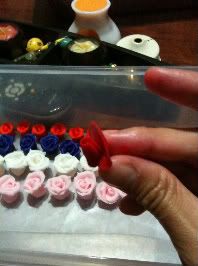
Tutorial: Fondant Roses
In this entry, I will share on how to mould fondant roses. These roses are edible as fondant is actually malleable icing sugar and is readily available at your local bakeries!=)
Step 1
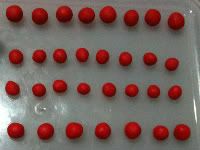
Roll fondant into balls of equal sizes so that the roses will be more uniform..
Step 2
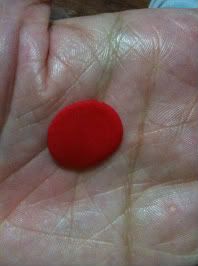
Take one and flatten it gently with your thumb, making sure that it's a circle and not oval
Step 3
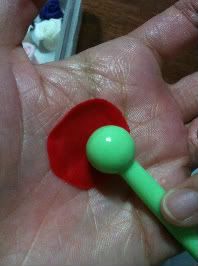
Using a ball tool, flatten it further in circular motion so that fondant will be thinner and resembles that of a petal
Step 4

Fold in one side of the petal gently (DO NOT FLATTEN)
Step 5
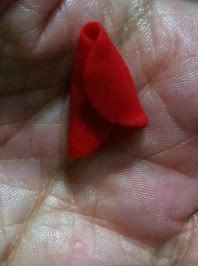
Do the same for the other side
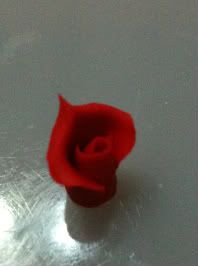
Step 6
This is how it should look like from the top and this will form the center of the rose
Step 7
Repeat Steps 1-3 and use the petal to cover the folded part of the rose center
Step 8
Pinch the centre of the petal from (Step 7) gently, to form the pointed part
Step 9
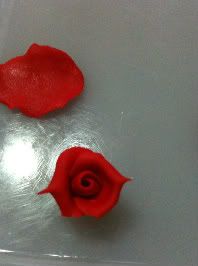
Do the same for the opposite side
Step 10
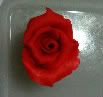
Continue adding the petals until you have the desired size/shape of the rose that you prefer
Good luck, happy trying and send me pictures of your own creations!! Can't wait!=)
May you get your bed of roses soon!!

Monday, December 6, 2010
Noretta's Wedding Gift Cupcakes
I was excited when Noretta told me the theme for these cuppies! Better still, she left the design to me so I didn't have any restrictions at all..=) She wanted all the cupcakes to have designs that are related to floorball like the goalpost, goalkeeper's suit, the helmet, ...oh well, you get the drift!
The set that I did for the groom's side (for Noretta) was not really well done coz some of the toppers had melted and I had to re-do some of it!!=( I was in such a rush that I managed to snap only 2 pathetic pics as compared to the set that I did for Noretta (for the groom). Although I have been baking for a year plus now, this was still an experience and I must tell myself NEVER to do last minute baking!! =_=
The set that I did for the groom's side (for Noretta) was not really well done coz some of the toppers had melted and I had to re-do some of it!!=( I was in such a rush that I managed to snap only 2 pathetic pics as compared to the set that I did for Noretta (for the groom). Although I have been baking for a year plus now, this was still an experience and I must tell myself NEVER to do last minute baking!! =_=
The Toppers
 |
| The little fondant bride!=) |
 |
| With natural locks just like Noretta!=) |
 |
| The headless groom! muahahha! |
 |
| Tadaaa! ^_^ |
 |
| Bride & Groom (love the dimples, just like Notz!) |
 |
| Jersey No. 15! |
 |
| His Tux.. |
 |
| Supposedly to be the keeper's suit! =_= |
 |
| Floorball sticks.. |
The Cupcakes with Icing!;p
 |
| White chocolate icing! YuMzZzzz!!!! |
From the Bride to the Groom
 |
| I'm loving it! ^_^ |
 |
| I like the blue floorball balls as well!! ;p |
From the Groom to the Bride
 |
| One of the 2 pics that I managed to snap before the groom's bro came to collect it..*haiz... |
Was kinda happy with how the toppers had turned out but I'm not exactly 100% satisfied 'coz I thought that I could have done much better if I had more time!! =/ I wish I had started earlier...grrrrr...am sooooo angry with myself..=/
Saturday, November 20, 2010
Dinosaur Cake - Timmy's 3rd Birthday
It was Timmy's 3rd birthday and I offered to do the birthday cake for his school celebration. Grace mentioned that he is currently into dinosaurs so I did just that!=) I surfed the internet for some ideas but there seemed to be this particular design which was rather common and it was more 2D than 3D so I decided to use only part of the designs I see online (body part) and experimented with the rest. As this was my first 3D cake, I did not use fondant to cover the cake but replaced it with buttercream instead as it is easier to work with.
As both my hands were busy with flour, sugar, icing etc, I did not take pics of the early processes. But I will state the steps that I had taken:
(Without the icing, the cake on its own weighs about 2kg plus)
1. For the dinosaur's body, I halved a 9" chocolate cake, put some buttercream to stick them together and placed the sliced side down on the cake board.
2. For the head, tail and four legs, I had cut a second chocolate cake into rectangular cubes, stick them with buttercream, stack them up and then carved out the tail and head using a small knife.
3. When the shape of the dinosaur had taken place, I crumb-coated the whole cake to seal the crumbs in so that it will easier to ice the cake and a "cleaner" finish with no crumbs sticking to the final coating.
4. I had then placed the cake in the fridge for about an hour before taking it out for the final icing

This how the cake looks like after the final coating

For the spikes and claws, I had used baking chocolate. The chocolate comes in small rectangular slabs so I just halved them to get the triangle shapes before sticking them at the back of the dinosaur. As for the claws, I just used the broken pieces from the baking chocolate so as not to waste the delicious bits.=)

For the eyes, I sliced marshmallows and stick a chocolate chip on each side. And the teeth, I had cut White Rabbit candies because not only are these my favourite candies but it also has that off-white colour that I want for my dinosaur's teeth. To further-defined the chocolate spikes, I had also placed Rice Krispies along the back of the dinosaur and sprinkle some conrflakes all over to add on to the details.

I had some chocolate icing left so I added in even more details like the brown spots, eyebrows, noses.....

As this cake was meant for children, I had made a "pull-out" kinda cake where the little ones can eat bits and pieces off it and that is why I included loads of little goodies like jellies and plenty of chocolates. For the sand, I used brown sugar.

Edible rocks!=)

View from the top..

Lil' Dino 'resting' in the fridge..eehheheh..
Didn't sleep the whole night doing this cake but it was well worth the effort definitely!! I thought the cake turned out ok considering it was my first time but maybe next time I should try to use more cake and carve the dinosaur body as well so it will look more realistic and use fondant! heh...;p
Farewell cake for Ratna
Wow, it has been awhile! And I had actually told myself to update regularly!heehee..;p Newae, it was a friend's last day at work so my co-teacher and myself decided to create a "naughty" cake for her. We found out on Thursday and Friday was her last day so I didn't bake the cake as we did not have enough time. Since it was an "emergency", we just bought 2 chocolate pound cake, carved and crumb-coated it with buttercream icing (which I had prepared at home) before covering it with fondant. It was a challenge coz we were also having our class party and had to multi-task from creating a cake, conducting games, preparing the food, packing the goody bags and cleaning up! We had a few heart attacks when a few potential cake-smashers came near to the cake but all that's well will end well..=)
We managed to finish up the cake just 5 minutes before the bell rang..hur hur hur..so here goessss...our cake collaboration!!


We managed to finish up the cake just 5 minutes before the bell rang..hur hur hur..so here goessss...our cake collaboration!!


I had stacked 2 chocolate pound cakes with buttercream in between, mixed some cocoa to the buttercream and crumb-coated the cake before adding the pink fondant, the white lace & borders and audrey did the purple roses

The purple roses that Audrey did..I think she is a fast learner. I had only taught her how to make the roses once and she is already able to make them sooo nicely! ^_^

We did not have much time left so that explains the rough finish of the buttercream and we just managed to roll some fondant to form Ratna's name and our initials.
Sunday, October 24, 2010
Halloween Cuppies!!
Boo! It's gonna be Halloween again! We don't really celebrate it in Singapore but I know of some places that do. And I find people in Singapore are less adventurous and "shy" to dress in an OTT kinda way so when I DO see people who are really dressed up, I'm entertained..hehe! Haven't got the chance to bake any halloween cakes or cupcakes this year but here are some pictures that I have baked previously for a friend!=)


Mummies unite!!!

This mummy looks kinda cute instead of scary!eheheh!

Mr. "Frankie"

Chomp! Chomp! Chomp!

Chocolate for mud, how cool is that!^_^

Blooody handss! =_=

The set of Halloween cupcakes! =)
Rasta Cupcakes
These cupcakes were butter cupcakes with Nutella filling; topped with buttercream frosting. The birthday gal was into the Rastafari or 'reggae' stuffs so with the requested number of cupcakes, I did the Rasta man, the marijuana leaf, the flag and the peace sign using Wilton fondant but I used the coloured ones. Really salute those bakies who actually make their own fondant. I wish I could but I don't have a KitchenAid and I don't have a big working table..blechz! Anyhow, here are the pics!! Enjoy!!;p


Buttercream in red, green and yellow!

8 cuppies in the box, "Rasta-ed"! hahahaha!

The marijuana leaf..

The Rasta man..I love the dreadlocks!have always wanted to make my hair like this but thinking of the smell...hmmm....decided not to! ;p
Saturday, October 9, 2010
Kuih Makmur
I have had loads of first-time bakes this year and the experiences that I have encountered have taught me to be a better baker, one year on (since I moved into my new place and have a proper oven!). Am really glad to have this platform where I can share the lessons learnt from my blunders in the kitchen and to allow all of you to try the 'tried and tested' recipes! ^_^ If only I have more time in hand...I will bake, bake, bake, bake! Problem is, who is gonna be my guinea pig??hahahah!
Anyhoo, back to the entry proper....'Kuih' is a Malay word that simply translates to: a general term that may be used to describe cookies, cakes, pastries and delicacies. 'Makmur' on the other hand means prosperity. So simply put, 'kuih makmur' is a "prosperity cookie" baked during the festive season. The former is rather apt coz you would want to wish everyone prosperity during the festivities!=) 'Kuih makmur' has a melt-in-the-mouth outer texture with a peanut filling and covered with icing sugar before serving.
I tried to bake kuih makmur for the Eid season last month during Ramadhan (fasting month for the Muslims) 'coz I have always loved eating kuih makmur. But it is rather difficult to find a good kuih makmur 'coz I like the ones that are not too big, generous amount of peanut fillings, melt in the mouth, no weird after-tastes, delicious taste of butter and of course, no burnt fillings please!! Heh! So, what better way to reach my makmur satiety than to bake them myself!heehee!
It was a very hands-on cookie so pardon me for the lack of pictures 'coz I didn't wanna get the stuffs around me all sticky! The recipe that I have used is my own, put together just to suit my personal preference! Here goessss!=)
Ingredients
Skin
1. 500g all purpose flour
2. 200g ghee
3. 50g butter
4. green food colouring (optional)
5. icing sugar
Filling
1. 400g roasted and chopped groundnuts
2. 200g of peanut butter
3. 2-3 tablespoons of castor sugar
(Mix and set aside)
Method
1. Dry-fry (without oil) the flour till slightly crispy
2. Melt ghee and butter and leave it to cool slightly
3. Add the ghee+butter solution into the flour bit by bit, knead to form a dough firm enough to work with
(Do not have to use up all of the ghee+butter mixture and you can add the colouring at this stage if you wish)
4. Preheat oven for 10mins at 160-170 Degree Celcius
5. Pinch a ball of dough, place filling into the centre and shape it into a leaf
6. Use a roller to form the leave indents (roll lightly), you can use the pincer but I do not have one so I modified mine!ehehehe!
7. Grease the tray before placing the 'kuih makmur' onto it
8. Bake till cooked
9. After cooling, sprinkle icing sugar and serve

Ready to be baked!^_^

Added too much of the liquid that the skin was quite thin! That's why the filling can be seen from this angle

Close-up

Baked and expanded

Good enough to eat on its own without the icing sugar
All readddyyy!! Woohoooo!
*** Flour is dry-fried to make it lighter and to attain the melt-in-the-mouth texture
*** The 'kuih makmur' will expand slightly after baking so do not mould it too big else, it'll be too huge and will also look less appealing!
*** Store in an air-tight container
A rather simple recipe so do try it out! Good luck! =)
A rather simple recipe so do try it out! Good luck! =)
Subscribe to:
Posts (Atom)